Mini Cart
Free Shipping in the Continental US and Parts of Canada. 
EuroLux Home
Exploring Antique Furniture and Home Decorating Ideas
1920s Bungalow Renovation Antique Clocks Antique Furniture Restoration Antique Furniture Styles Antique Reproduction Furniture Antiques Buying Trip Client Spotlight Food & Entertaining

Ceramic Restoration Tips

Oops... crash! Do you have any broken ceramic items lying around the house waiting to be repaired? We've got some tips so you don't have to put the job off any longer! Greg's mom Kathy is our Director of Ceramic Restoration Services and she is a certified expert in fine ceramics restoration. Kathy made this video with tips on how to fix your broken ceramics.
The item Kathy repairs in the video is a broken ceramic figurine, a.k.a. Prudence. The large figurine was shipped from Europe to a friend of ours and it arrived with a broken arm. Our friend asked Kathy to take a look at Prudence and see if she could do a repair on the poor girl's arm. Of course, if EuroLuxHome.com packed and shipped this figurine (or any other antique ceramics in our gallery) it would not arrive broken!
Prepare to Fix your Broken Ceramic
1. Kathy says that before starting with the glue, make sure you have paper towels handy as you will definitely need them.
2. Then she starts by looking at the broken surface to see what kind of glue is needed to repair it. She rubs the broken edge with a toothbrush and sees that some powder comes off it. She also sees a few little air holes. This tells Kathy that it's a soft paste with a lower firing temperature than some other ceramics.
3. With that information she chooses a white glue. The scientific name is polyvinyl acetate (PVA). Elmer's white glue is the brand Kathy's prefers. It goes on white and becomes clear as it dries. Note that white glue is water-soluble. It is unlikely that anyone will ever need to put Prudence in water... she's already suffered enough! But if you do fix a broken ceramic with white glue, you must remember not to soak it later otherwise it will come apart.
4. If there is already glue on the raw edge from a previous fix, you need to clean that off or the new repair won't seat perfectly.
5. Kathy uses a cardboard box to put the item in and support it while she works. This trick means that gravity does the work for you. The broken ceramic remains stable as it is lodged against the sides of the box. Prudence is a large figurine so Kathy got a banana box from a grocery store. If you have a smaller item to mend, then you would choose a smaller box.
Now the stage is set... let's get on with the show!
Tips for Ceramic Restoration
Kathy places the figurine so it balances and is lodged perfectly in the box. Before placing the arm, she is careful not to scrape the broken edge of the piece around too much. She doesn't want to loosen particles that will interfere with the seating of the piece.
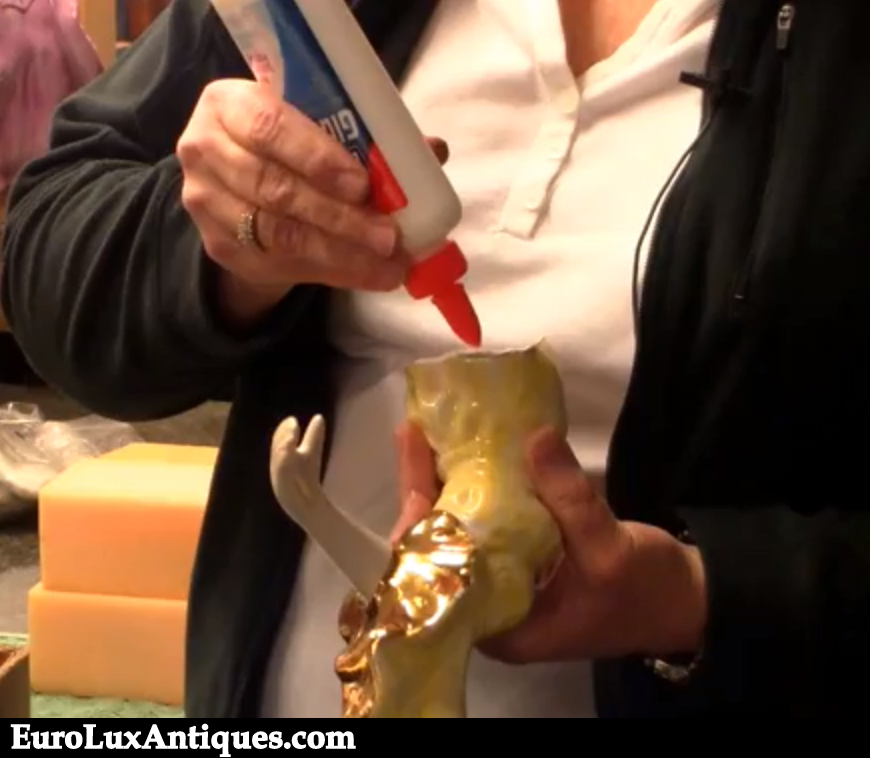 Next, Kathy applies glue all around the edge of the piece. Some people say to put the glue on both edges of the break - the broken piece itself and the main body you're attaching it to. Kathy doesn't usually do that unless it's quite a wide break. But she does recommend applying the glue all around the edges of the break and then putting some glue down just inside the rim of the break. Then when she places the arm back on the figurine, the glue will run down on the inside. It covers the break on the inside too and gives a little extra strength to the repair.
Once the arm is seated, Kathy wipes off any excess glue spilling on the outside. Then she presses the broken pieces together as hard as she can for about one minute.
"That helps it to heal," she says. (You can tell that Kathy was a nurse in the U.S. Navy. She worked in that profession for 35 years!) Because white glue is water-soluble, she can go back later once the glue has dried and easily clean off any other excess glue.
So now you know how to fix your broken ceramic items. Let us know how it goes or ask any other questions in the comment box below. Kathy also gave some great tips on deciding when to leave antiques repairs to a professional and when to tackle it yourself in our blog post: When It Breaks: DIY or Professional Restorer?

Aimee owns EuroLuxHome.com with her husband and best friend, Greg. With over 20 years' experience in acquiring and selling French Antique Furniture, she is very knowledgeable about furniture styles and how they are influenced by historical events. Aimee has shipped antique furniture and antique furniture reproductions to all 50 States and over 50 foreign countries. Subscribe to this blog for articles about antique furniture construction methods, style trends and even repair tips. Check out our YouTube channel!
Recommended Posts
-
Why We Love Renaissance Style Furniture
The Renaissance era had such a deep impact that even hundreds of years later, craftsmen were still trying to emulate its accomplishments. This furniture style became popular again in 19th century France. The antique Renaissance style furniture that we sell today is from this Revival period, dating to the late 19th and early 20th-century. This is the same era as...
Read On -
Antique Beds: 4 Things to Know
More time is spent in the bedroom than any room in the home. The mood of the room sets the tone of your day when you wake up, and lets you unwind as you go to sleep. With that in mind, it's important to go all-out on this space's decor! Purchasing an antique bed is an investment to say the...
Read On -
Clocks for the Home
Without superb wall decor in all of the primary living rooms and bedrooms, a house isn't a house. A high-quality timepiece on your nightstand or a desktop clock in your home office can elevate your interior design. It's just not the same telling the time on your phone! New, vintage, and antique clocks in traditional styles provide character and a...
Read On